Do you want to save money on your energy bills? Then, learning how to install heat pump thermostat is a smart choice! Moreover, a properly installed thermostat can help your family save up to 10% on heating and cooling costs each year. For Las Vegas families living in homes and high-rise buildings, this can mean big savings during our hot summers and cool winters. Additionally, heat pump thermostats are special devices that work differently from regular air conditioning controls. At Doctor Heat Pump, we help families every day understand their heating and cooling systems better. In this guide, we’ll walk you through everything you need to know about installing your new thermostat – from preparing your space to wiring and configuring the system for optimal performance.
Heat Pump Thermostat Basics
What Makes Heat Pump Thermostats Special
First, heat pump thermostats are very different from regular air conditioning controls. While regular thermostats only cool your home, heat pump controls can both heat and cool your space. Furthermore, these special controls have an important part called an O/B terminal. This terminal controls something called a reversing valve, which helps your heat pump switch between heating and cooling modes.
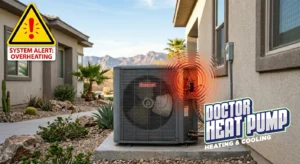
Additionally, heat pump controls can manage something called auxiliary heat. When Las Vegas gets those rare cold nights, auxiliary heat helps keep your home warm. Therefore, it’s important to choose a thermostat that’s made for heat pumps – not all models work correctly.
Why You Need the Right Type
Most importantly, you must check that your new thermostat works with heat pumps. Otherwise, your system won’t work properly. Here’s a simple table to help you understand the differences:
| Regular Thermostat | Heat Pump Thermostat |
|---|---|
| Only controls cooling | Controls heating and cooling |
| No O/B terminal | Has O/B terminal for reversing valve |
| Simple wiring | Special wiring needed |
| Can’t handle auxiliary heat | Manages auxiliary heat properly |
The C-Wire: Your Power Source
Furthermore, most smart and programmable thermostats need something called a C-wire. This wire gives your thermostat power all the time. Consequently, if you don’t have a C-wire, your new thermostat might not work correctly. However, don’t worry – many new thermostats come with special adapters to solve this problem.
Tools and Safety First
What You’ll Need
Before you start learning how to install heat pump thermostat, gather these simple tools:
- Screwdrivers (both flat and star-shaped)
- Wire strippers
- A tool to check electricity (multimeter)
- A drill
- A level to make sure things are straight
- Protective gloves and safety glasses
Stay Safe While Working
Most importantly, safety comes first when you work with electricity. Therefore, always turn off the power at your circuit breaker before you start. Then, use a voltage tester to make sure no electricity is flowing. Additionally, wear gloves and safety glasses to protect yourself.
Also, take a clear photo of your old wires before you remove anything. This picture will help you remember where each wire goes later. Furthermore, work in a bright area so you can see everything clearly.
How to Install Heat Pump Thermostat: Step by Step
Remove Your Old Thermostat
First, turn your old thermostat to the OFF position. Then, wait for your heating or cooling system to stop running completely. Next, turn off the power at your circuit breaker. After that, carefully remove the cover from your old thermostat.
Before you remove any wires, take a photo of all the connections. This photo is very important! Subsequently, use the labels that come with your new thermostat to mark each wire. Finally, gently disconnect each wire and tape them to the wall so they don’t fall inside.
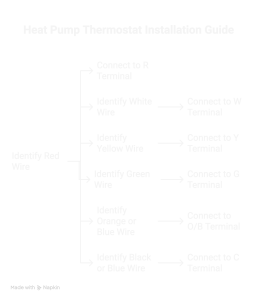
Understanding Wire Colors and Connections
Learning how to install heat pump thermostat means understanding what each wire does. Here are the most common wire colors and their jobs:
| Wire Color | Letter | What It Does |
|---|---|---|
| Red | R | Gives 24-volt power |
| White | W | Controls auxiliary heating |
| Yellow | Y | Turns on cooling |
| Green | G | Runs the fan |
| Orange or Blue | O/B | Controls the reversing valve |
| Black or Blue | C | Provides continuous power |
Mount and Connect Your New Thermostat
Now, it’s time to put up your new thermostat. First, hold the new base against the wall where your old one was. Then, use a level to make sure it’s straight. Next, mark where the screws will go with a pencil.
After that, drill small holes if needed and put in wall anchors. Then, pull your labeled wires through the opening in the new base. Following this, screw the base to the wall firmly.
Most importantly, when connecting wires, make sure each wire goes to the right terminal. Use your photo and the wire labels to help you. Additionally, tighten each screw firmly, but don’t over-tighten them.
Testing Your New Thermostat
First Steps After Installation
Once you finish connecting everything, it’s time to test your work. First, put batteries in your thermostat if it needs them. Then, attach the front part to the base. After that, turn the power back on at your circuit breaker.
If everything is working correctly, you should see the display light up. Moreover, you might see “SEt” or the current temperature on the screen. This means your installation is working!
Make Sure Everything Works
Next, test both heating and cooling modes to make sure your thermostat can switch between them. Additionally, check that the temperature on the display matches the actual room temperature. Furthermore, listen for your heat pump to start when you change the temperature setting.
For heat pump systems, you’ll also need to set up special features. Therefore, follow your thermostat’s instruction book to set the compressor delay to at least 3 minutes. This helps protect your heat pump from damage.
Troubleshooting Common Problems
When Things Don’t Work Right
Sometimes, even when you follow all the steps for how to install heat pump thermostat, problems can happen. However, most issues are easy to fix. First, if your display is blank, check your batteries. Also, make sure the power is on at your circuit breaker.
Additionally, if your system won’t switch between heating and cooling, check your O/B wire connection. This wire is very important for heat pumps. Furthermore, if your thermostat shows error codes, check your instruction manual to understand what they mean.
Simple Fixes You Can Try
If your thermostat isn’t working correctly, try these simple steps:
- Check all wire connections to make sure they’re tight
- Replace the batteries if your thermostat uses them
- Reset your thermostat by following the instruction manual
- Make sure your air filter is clean
However, if these steps don’t solve your problem, it might be time to call a professional.
When to Call Doctor Heat Pump
Complex Situations Need Experts
While learning how to install heat pump thermostat is possible for many Las Vegas homeowners, some situations need professional help. For instance, if you have a dual-fuel system that uses both a heat pump and a gas furnace, you should call an expert. Additionally, high-voltage systems or systems with multiple transformers are too complex for most homeowners.
Furthermore, if you’re not comfortable working with electricity, it’s always better to call a professional. At Doctor Heat Pump, we understand Las Vegas homes and the unique challenges of our desert climate. Moreover, our team can handle any type of heat pump thermostat installation safely and correctly.
Why Choose Professional Installation
Professional installation gives you several benefits. First, experts have experience with many different heat pump models. Additionally, they can recommend the best thermostat features for your specific needs. Most importantly, professional installation gives you peace of mind that your system is safe and correctly set up.
Also, professional installation often comes with warranties and ongoing support. Therefore, if you have problems later, you know who to call for help. Furthermore, professionals can spot potential issues before they become expensive problems.
Las Vegas Heat Pump Tips
Perfect Climate for Heat Pumps
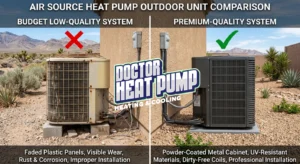
Las Vegas has an ideal climate for heat pump systems. Since our winters are mild, heat pumps work very efficiently all year long. Additionally, modern heat pumps can handle our hot summer days very well. For families in high-rise buildings, heat pumps offer an excellent solution for year-round comfort.
Moreover, heat pumps can save Las Vegas families significant money on energy bills. According to the U.S. Department of Energy, heat pumps can reduce electricity use for heating by up to 75% compared to electric resistance heating. Therefore, the investment in learning how to install heat pump thermostat correctly pays off quickly.
Maintaining Your Investment
After you install your new thermostat, regular maintenance helps keep everything working properly. First, check your air filters monthly and replace them when dirty. Additionally, keep the area around your outdoor unit clear of debris and plants.
Furthermore, schedule annual professional maintenance with Doctor Heat Pump to keep your system running efficiently. This maintenance can help prevent expensive repairs and keep your energy bills low. Also, during maintenance visits, technicians can check your thermostat settings to make sure everything is working correctly.
For more information about heat pump maintenance, check out our blog post on How Often Does a Air Heat Pump Need Maintenance? Vegas Guide
How to install heat pump thermostat: Frequently Asked Questions
Can I upgrade to a smart thermostat?
Yes! Most Las Vegas homes can upgrade to smart thermostats. However, make sure the smart thermostat you choose works with heat pumps. Additionally, you’ll need a C-wire for most smart models.
What if there’s no C-wire?
Don’t worry! Many new thermostats come with power adapters. Additionally, professional installers can add a C-wire if needed. Furthermore, some newer thermostats can work without a C-wire.
What’s the difference between heat and emergency heat?
Regular heat mode uses your efficient heat pump. However, emergency heat uses less efficient backup heating elements. Therefore, only use emergency heat when your heat pump isn’t working properly.
How often should I replace thermostat batteries?
Most thermostats need new batteries once or twice a year. Additionally, many models will show a low battery warning before they stop working.
Conclusion
Learning how to install heat pump thermostat can help Las Vegas families save money and stay comfortable year-round. Moreover, with the right tools, safety precautions, and patience, many homeowners can successfully complete this project. Additionally, understanding your heat pump system helps you make better decisions about maintenance and repairs.
However, remember that some installations are complex and need professional help. Therefore, if you’re not comfortable with any step, don’t hesitate to call Doctor Heat Pump. Furthermore, professional installation ensures your system works correctly and safely.
Most importantly, a properly installed heat pump thermostat can provide years of reliable service and energy savings. Additionally, it gives you better control over your home’s comfort in Las Vegas’s unique desert climate. For expert heat pump services and thermostat installation, contact Doctor Heat Pump today!
Whether you live in a house or high-rise building, understanding how to install heat pump thermostat is a valuable skill that can save your family money and improve your comfort for years to come.
References
- U.S. Department of Energy – Heat Pump Systems
- U.S. Department of Energy – Air-Source Heat Pumps
- ENERGY STAR – Air-Source Heat Pumps
- U.S. Department of Energy – Pump Up Your Savings with Heat Pumps