

Finding water near your heat pump is one of those moments that immediately raises questions. Is this serious? Is the system broken? Should I turn it off? The answer depends on where the water is coming from, how much there is, and what the system was doing when you noticed it. Some moisture around a heat pump is completely normal. Other situations signal a problem that can damage your home or your equipment if left unaddressed. At Doctor Heat Pump, water-related calls are among the most common we receive — and this guide gives you a clear framework for understanding what you’re looking at before you call.
Normal vs. Abnormal Moisture: The First Question to Answer
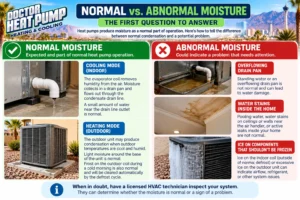
Before assuming something is wrong, it helps to understand that heat pumps produce moisture as a normal part of operation.
In cooling mode, the evaporator coil inside the air handler removes humidity from the air as it cools it. That moisture collects in a drain pan beneath the coil and flows out through a condensate drain line. On a humid Las Vegas summer day — particularly during monsoon season in July and August — a system can remove several gallons of moisture from the air per hour. A small amount of moisture near the air handler’s drain line outlet is normal.
In heating mode, the outdoor unit may produce condensation — particularly when outdoor temperatures are cool and humid. Light moisture around the base of the outdoor unit is normal. Frost on the outdoor coil during a cold morning is also normal and will be cleared automatically by the defrost cycle.
What’s not normal is pooling water inside the home, significant water staining on walls or ceilings near the air handler, a drain pan that’s visibly overflowing, or ice on components that shouldn’t be frozen.
Common Causes of a Heat Pump Leaking Water
When water appears somewhere it shouldn’t, one of these causes is almost always responsible.
Clogged Condensate Drain Line
This is by far the most common cause of water problems in Las Vegas heat pump systems. The condensate drain line carries moisture from the drain pan to a drain point — typically a floor drain, utility sink, or exterior outlet. Over time, algae, mold, dust, and debris accumulate inside the drain line and form a blockage.
When the drain line clogs, moisture backs up into the drain pan. When the pan fills, water overflows — onto the air handler, into the ceiling or walls below, or onto the floor around the unit. In Las Vegas, where dust accumulation is significant and systems run heavily, drain line clogs happen more frequently than in moderate climates.
Signs of a clogged drain line include water around the base of the indoor unit, water stains on the ceiling below an attic-mounted air handler, the system shutting off unexpectedly if it has a float switch safety, and visible standing water in the drain pan.
A clogged drain line is often a homeowner-fixable problem. Flushing the line with a wet/dry vacuum at the drain line access point clears most clogs. Professional service visits typically include a drain line flush and inspection — one of the most important reasons to stay on a regular maintenance schedule. For more on what a professional service visit covers, see our guide on heat pump service in Las Vegas.
Frozen Evaporator Coil
When the evaporator coil inside the air handler freezes over, the ice that forms eventually melts — and the resulting water can overwhelm the drain pan’s capacity. The drain pan is sized for normal condensate volume, not for the sudden melt of an iced-over coil. The result is water spilling out of the pan and appearing where it shouldn’t.
Several things cause a frozen evaporator coil. Restricted airflow from a severely clogged air filter is the most common. Low refrigerant, which causes the coil to operate below its normal temperature range, is another. Blocked supply or return vents that restrict system airflow can also cause freezing.
If you notice ice on the refrigerant lines near the air handler or water appearing suddenly in larger amounts than usual, check the filter first. Turn the system off — not just to fan mode — and allow the coil to defrost fully before running the system again. A defrost with the air handler off typically takes 30 to 60 minutes. If the coil freezes again after defrosting, the underlying cause needs professional diagnosis.
Cracked or Damaged Drain Pan
The drain pan beneath the evaporator coil catches condensate and channels it to the drain line. In older Las Vegas systems — or systems that have experienced heavy use and temperature cycling — the drain pan can develop cracks or corrosion that allow water to escape before reaching the drain outlet.
A cracked drain pan isn’t a homeowner repair. It requires either sealing or replacing the pan, which involves accessing the air handler cabinet. This is a job for a licensed technician.
Disconnected or Improperly Installed Drain Line
A drain line that has come loose from its connection point at the drain pan or at the drain outlet will deposit condensate water wherever the disconnected end is pointing — often inside a wall, ceiling cavity, or utility closet. This is more common in systems that have had recent service work where the drain line was disturbed, or in older systems where original drain line connections have loosened over time.
If water appears suddenly after a service visit or after any work on the HVAC system, a disconnected drain line is a likely explanation. Turn the system off and call the contractor.
Refrigerant Leak
A refrigerant leak doesn’t directly cause water, but it causes the evaporator coil to operate at abnormally low temperatures — which leads to coil freezing, which leads to water from the melt cycle as described above. If the coil keeps refreezing despite a clean filter and good airflow, refrigerant level should be checked by a technician.
Refrigerant never depletes on its own. Low refrigerant always indicates a leak that needs to be found and repaired before the system is recharged. Running a system with a refrigerant leak puts the compressor at risk from inadequate lubrication. For more on refrigerant and how it affects system performance, see our guide on how the heat pump refrigeration cycle works.
Improper Installation Pitch
The drain pan and drain line need to be installed with a slight downward pitch toward the drain outlet so gravity moves condensate in the right direction. If the air handler was installed level or with the wrong pitch, condensate doesn’t drain properly and accumulates in the pan until it overflows. This is an installation error that requires correcting the air handler mounting angle — a job for a technician.
How Much Water Is Too Much?
Las Vegas homeowners sometimes aren’t sure whether the amount of moisture they’re seeing is a problem. Here’s a rough guide.
Probably normal:
- A small puddle of moisture directly below the outdoor unit’s base
- Occasional drips from the condensate drain line outlet during heavy cooling operation
- Light frost on the outdoor coil on a cold morning that clears within an hour
Probably a problem:
- Standing water inside the air handler cabinet or directly below it
- Water stains appearing on drywall, ceilings, or flooring near the air handler
- A drain pan that’s visibly full of water or overflowing
- Ice on the refrigerant lines near the air handler
- Water appearing in a location that was dry before — even small amounts
When in doubt, err on the side of caution. Water damage in walls and ceilings from an overflowing condensate drain can be expensive to remediate — far more than a drain line flush or drain pan replacement.
What to Do When You Notice a Leak
Work through these steps before calling for service.
Step 1 — Turn the system off. If you’re seeing significant water or ice, turn the heat pump off at the thermostat. Running the system while a drain pan is overflowing makes the water problem worse. Running it while the coil is frozen can damage the compressor.
Step 2 — Check and replace the air filter. A restricted filter is one of the most common causes of coil freezing and the associated water problems. Replace it if it’s dirty.
Step 3 — Locate the drain pan. Access the air handler cabinet and look at the drain pan. Is it full? Is there visible debris or algae in it? Is there a crack or visible damage?
Step 4 — Check the drain line. Follow the drain line from the pan to its outlet. Confirm it’s connected at both ends. If it’s accessible, try flushing it with a wet/dry vacuum at the access port.
Step 5 — Check for ice. Look at the refrigerant lines near the air handler and the evaporator coil if it’s visible. Ice that shouldn’t be there indicates a freezing problem.
Step 6 — Call for service if the problem persists. If the drain line isn’t obviously clogged, if the coil keeps freezing after defrost, or if you can’t identify the water source, a technician needs to diagnose the issue. Water damage escalates quickly — don’t wait to see if it resolves on its own.
Preventing Heat Pump Water Problems in Las Vegas
Most water-related heat pump problems are preventable with consistent maintenance. These steps reduce the likelihood significantly.
Flush the condensate drain line regularly. Pour a cup of white vinegar or a diluted bleach solution into the drain line access port every few months during the cooling season. This inhibits algae and mold growth that causes clogs before they form.
Replace the air filter monthly during heavy use. A clean filter prevents restricted airflow — the most common cause of evaporator coil freezing and the water problems that follow.
Schedule annual professional maintenance. A professional service visit includes drain pan inspection, drain line flushing, coil inspection, and refrigerant level check — the full set of tasks that prevent water problems before they start. For a complete fall maintenance checklist, see our guide on fall HVAC maintenance in Las Vegas.
Confirm your system has a float switch. A condensate float switch shuts the system off automatically when the drain pan reaches a certain water level — preventing overflow damage. Many modern systems include this safety as standard. Older systems may not. Ask your technician whether your system has one and whether adding one makes sense.
Why Las Vegas Homeowners Choose Doctor Heat Pump
Doctor Heat Pump is a local, family-owned HVAC company serving Las Vegas, Henderson, and North Las Vegas. We handle the full range of heat pump repair and maintenance — including drain system issues, coil freezing diagnosis, and refrigerant service — across all major brands.
When you call us about a heat pump leaking water, we identify the source accurately and give you honest options. We don’t recommend unnecessary repairs — and we don’t leave you guessing about what caused the problem or whether it’s likely to happen again.

Frequently Asked Questions
Is it normal for my heat pump to drip water outside?
Small amounts of moisture around the base of the outdoor unit are normal — particularly during the cooling season when the system is rejecting heat and some condensation forms on the outdoor coil. Light moisture is different from pooling water or water appearing inside the home.
Why is my heat pump leaking water inside the house?
Water inside the home almost always comes from the condensate system — either a clogged drain line, an overflowing drain pan, a cracked pan, or a frozen evaporator coil that’s melting. Turn the system off and check the filter first. If the problem isn’t resolved by a filter replacement and drain line flush, call for service.
Can I keep running my heat pump if it’s leaking water?
It depends on the source. If the leak is from a clogged drain line causing pan overflow, running the system makes the water damage worse. If the coil is frozen, running the system risks compressor damage. Turn the system off until the source is identified and addressed.
How much does it cost to fix a heat pump water leak in Las Vegas?
Cost depends on the cause. A drain line flush during a service visit is typically included in a standard maintenance fee of $100 to $200. A drain pan replacement runs $200 to $500. A refrigerant leak repair runs $300 to $800. A frozen coil from a dirty filter costs only the price of the filter if caught early — or significantly more if the coil is damaged.
What is a condensate float switch and do I need one?
A float switch is a safety device that shuts the system off automatically when the condensate drain pan fills to a certain level — preventing overflow and water damage. Many modern systems include one. Older systems may not. Adding a float switch is a relatively inexpensive safety upgrade — typically $75 to $150 installed — that can prevent significant water damage from a clogged drain line.
Heat Pump Leaking Water? Don’t Wait to Find Out Why.
Water from a heat pump rarely resolves on its own — and the longer it continues, the more potential there is for water damage to walls, ceilings, flooring, and the equipment itself. Catching the cause early keeps a simple fix from becoming an expensive repair.
Doctor Heat Pump is ready to help across Las Vegas, Henderson, and North Las Vegas. Call us at 702-467-7236 or contact us online to schedule a diagnostic visit. We’ll find the source of the leak and give you a clear plan to fix it.

References
- U.S. Department of Energy — Heat Pump Maintenance and Condensate Systems
- ENERGY STAR — Heat Pump Performance and Service
- Lennox — Heat Pump Maintenance and Troubleshooting